In today’s contemporary society, we store a wealth of data on our computers, some of it private and very sensitive. Keeping those data secure and maintaining privacy are highly important for any Mac user. Yet many of us give it scant attention and do little more than the bare minimum, if anything at all to ensure that hackers, opportunists and, yes, even the authorities, are able to access as little of our personal data as possible. This articles explains how you can password protect files and folders on your Mac.
There are three places threats to your data are likely to come from: over the internet, via an email, or from someone with direct access to your Mac. Taking steps to protect yourself will minimise the risks.
You can protect all the files on your Mac by encrypting your entire hard drive with FileVault.
But maybe you don’t need to protect all your files, or you just think FileVault is a bit overkill for your purposes. There are simpler options for password protecting certain files and folders.
We’ll cover password protecting individual files and folders on your Mac.
Encrypt your entire Mac
Use your Mac’s built-in FileVault to securely encrypt your entire hard drive. According to Apple, “FileVault full-disk encryption (FileVault 2) uses XTS-AES-128 encryption with a 256-bit key to help prevent unauthorized access to the information on your startup disk.”
In other words, FileVault scrambles your hard disk so that only you (with the password) can access any data on it. It’s available for free in OS X Lion and later. Here’s how to set it up:
-
-
- Open the Apple menu > System Preferences > Security & Privacy
- Click the FileVault tab
- Click the padlock, then enter an administrator name and password
- Click Turn On FileVault
-
You’re done. Your hard drive will be encrypted, and anyone who starts up your Mac will need your password to continue.
Note: It may take some time to fully encrypt your Mac. According to Apple, “Encryption occurs in the background as you use your Mac, and only while your Mac is awake and plugged in to AC power.”
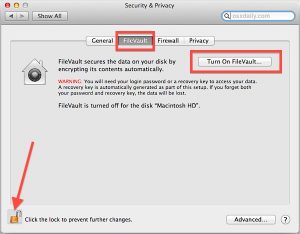
macOS’s FileVault encrypts files stored on your Mac’s boot drive using military-level encryption, meaning if your Mac is lost or stolen your data will be safe.
However, that security comes at a price — speed. Running FileVault will slow down your Mac, and sometimes noticeably. So you should only use it if you really need to.
You could use macOS’ FileVault to encrypt every file on your Mac. But it consumes resources and hits your Mac’s performance. For most of us, it’s overkill. But you should make sure that all sensitive or personal data stored on your Mac is encrypted.
FileVault is off by default, as most users may find that encrypting the entire drive is a bit overkill. The inconvenience of having to type a password to open a file and the extra time required to initially encrypt your entire drive may outweigh the security FileVault provides.
If you mainly use your Mac at home or in other mostly secure environments, FileVault may not be the ideal security solution.
Consider some of the other options we present in this article such as password protecting individual files or using third-party app like Kruptos 2 Pro.
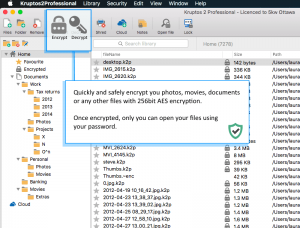
Kruptos 2 Professional for the Mac is an easy to use file encryption program that uses 256-bit encryption to password protect your private files and prevent them from being modified, read or even accessed without the correct password.
Using Kruptos 2 Pro, you can efficiently encrypt and decrypt selected files or folders in your Mac, where other not so important files and folders can remain unencrypted at the same time.
Best of all, you can download it free here and give it a try. You’ll be surprised about how easy its to protect and control access to your sensitive data.
Password-protect iWork docs, Microsoft Office docs, and PDFs
Perhaps, you don’t need to protect all your files, or you just think FileVault is a bit overkill for your purposes. There are simpler options for password protecting certain files and folders.
We’ll look into how to password protecting individual files and folders on your Mac.
How to password-protect iWork documents on Mac
iWork, Apple’s version of Microsoft Office, comes stock with any Mac. And it allows you to password-protect any Pages, Keynote, or Numbers file in a few simple steps:
-
-
- Open the iWorks file you want to protect
- Click File > Password
- Enter a password and then Verify it
- (optional) To help you remember the password, enter a Password Hint
- Finally, click Set Password
-
The next time anyone tries to open that document, they’ll need to enter your password.
How to password-protect Microsoft Word documents on Mac
Working on the next great American novel, and don’t want others to read it? Here’s what you can do about it:
-
-
- Open the Word doc you want to protect
- Click the Review tab
- Click Protect Document
- On the Password Protect screen, enter a Password under Set a password to open this document. (You can even require a Password to modify the Word document)
- Finally, click OK
-
The next time anyone tries to open that Word doc, they’ll need to enter your password.
To remove the password, open your Word doc and go to Review > Protect Document. Delete the passwords on the Password Protect screen and click OK.
Password-Protecting your Microsoft Word doc is very easy
How to password-protect Microsoft Excel documents on Mac
Adding a password to an Excel document differs a bit from adding one to a Word doc, but it’s still easy. Here’s how to do it:
-
-
- Open the Excel doc you want to protect
- On the menu bar, go to File > Passwords
- On the File Passwords screen, enter a password in the Password to open box. (You can even require a Password to modify the Excel document)
- Finally, click OK
-
The next time anyone tries to open that Excel doc, they’ll need to enter your password.
To remove the password, open your Excel doc, go to File > Passwords, and delete the password on the File Passwords screen.
Password-Protecting your Microsoft Excel is also easy
How to password-protect Microsoft PowerPoint documents on Mac
Your business PowerPoint presentations can often contain a lot of sensitive information, so it’s best to lock them down to keep them out of the wrong hands. Here’s how to do it:
-
-
- Open the PowerPoint presentation you want to protect
- On the menu bar, go to File > Passwords
- Under Password to open, check the Encrypt this presentation and require a password to open box
- On the Set a password for this presentation , enter a New password and then Verify the password
- Click Set Password
- Finally, click OK
-
The next time anyone tries to open that PowerPoint presentation, they’ll need to enter your password.
To remove the password, open your PowerPoint presentation, go to File > Passwords, and uncheck the Encrypt this presentation and require a password to open box.

How to password-protect PDF Files on Mac
Mac owners can password-protect any PDF right out of the box. No 3rd-party app is needed, thanks to Preview. Here’s how to use Preview to password-protect your PDFs:
-
-
- Open the PDF file you want to protect in Preview
- Open the File menu and then press the Option key, which will change the Duplicate menu option into Save As
- Select Save As
- Check the Encrypt box towards the bottom of the Save screen
- Enter a Password and then Verify it
- Click Save
-
The next time anyone tries to open that PDF, they’ll need to enter your password.
(Note: This will only work for PDFs. Preview does not support password-protecting images.)
To remove the password from the PDF, just open the PDF and enter your password. Press the Option key to access Save As in the File menu as mentioned above, and then uncheck the Encrypt option. Save the PDF with a new name, and then delete the original, password-protected file.
Password-Protect Your Files and Folders on Mac using Kruptos 2 Pro
Once installed, Kruptos 2 Pro integrates with Mac OS, making for a really natural and easy solution to the problem of data security. You can drag folders and files directly to the app, at which point they are immediately encrypted and password-protected.
Kruptos 2 Pro supports inbuilt file shredder and share your encrypted files (cross-platform compatibility) between your Mac, Windows PC, Android device and the Cloud.
The app even allows you to create in-app notes for securely writing down passwords, bank accounts, pin numbers, and any other sensitive information.
Password-Protecting your Files and Folders is very easy
In conclusion, always remember below tips to protect your Mac and keep your data safe:
-
- Be aware of your surroundings
- Physically deter with the use of a locks
- Set up a Mac finding app
- Encrypt your files before moving (Kruptos seamlessly integrates with all major cloud providers) to Dropbox and iCloud
- Download Kruptos 2 Pro to encrypt your sensitive files
How do you protect your files and folders on your Mac? Do you use any other apps to secure your data? Share your thoughts with us in the comments below.

